
How To Measure Carpeting for Stairs
|
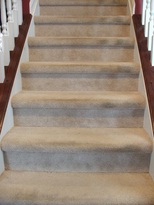
There are two methods for installing carpet on stairs. The waterfall method is where one continuous piece of carpet covers each riser and tread. The cap and band method is where a separate piece of carpet covers each tread and riser.
The waterfall method is ideal when the steps are all uniform. |
|
- Measure the tread: The tread of the step is the part you step on. Starting with the top step, measure the depth of the tread. Be sure to extend the tape measure all the way to the outer edge of the step.
- Measure the riser: The riser, or fall, of the step refers to the height or distance between one step and the next.
- Combine the two measurements: Add the two measurements together. Then add 2 inches (5 centimeters) to allow for covering the edges and for bulges in the padding. Multiply this number by the number of steps you have to cover.
- Measure the width: Measure the width of the steps to know how wide the piece of carpet must be. Again add 2 inches (5 centimeters) for allowances.
How To Test if your existing paint is
Oil or Latex based
Before painting over an existing paint you can take some denatured alcohol or fingernail polish remover on a cloth and lightly rub it on an inconspicuous test area.
If the paint softens and is easily removed, then it is a latex paint. If the paint does not really seem to be affected by the test, it is typically an alkyd/latex coating.
If the paint softens and is easily removed, then it is a latex paint. If the paint does not really seem to be affected by the test, it is typically an alkyd/latex coating.
Spring Maintenance For Your Home
Spring is the perfect time to perform a quick to-do list for maintenance in and around your home.
- Test all ground fault circuit interrupters in your washrooms, kitchens, outside receptacles and on the electrical panel
- Replace your furnace filters and have a technician inspect the furnace fan belt
- Inspect the roof visually from the ground if possible – if you have to go onto the roof, wear a safety harness or hire a contractor.
- Clean gutters and down-pipes, and make sure downspouts and splash pads drain away from walls and foundation
- Inspect caulking inside and out, and touch-up or replace where needed with products designed for the job
- Clean windows and window tracks, and make sure weep holes are not blocked (including sliding door tracks – lubricate openers and track rollers with silicone spray).
- Review flashing for damage or staining
- Turn on the interior water supply to hose bibs and exterior faucets, and check for leaks
Water Heater Maintenance
|
Both gas and electric water heaters require minimal maintenance that when done on a regular basis, could save you thousands in water heater replacement costs as the maintenance will extend the life and performance of your water heater. Be aware than any work on a hot water heater does require some care and respect for components in use such as natural gas, electricity, hot water (possibly steam), and sharp metal edges. Always wear protective gear such as leather gloves and protective eye-wear. Read through the entire procedure before you start so you know if you’re comfortable performing this maintenance or not. |
|
DRAIN the TANK
Over time naturally occurring calcium in the water will ‘scale’ and settle at the bottom of your tank. This calcium build up is muddy, sometimes gritty, and commonly known as sediment. Sediment build-up in your tank will lead to many problems, but most importantly it becomes a barrier between the heat source at the bottom of the tank and the water its trying to heat. This barrier forces the tank to work harder to heat the water which further breaks down the integrity of the tank floor. Regular draining of the tank prevents sediment build-up.
How to drain your hot water heater (recommended every 4-6 months):
In the case of an electric hot water tank first shut off the electricity to the tank (the breaker should be clearly labeled on your homes electric panel). If you have a natural gas hot water heater, to drain the tank, first shut off the gas valve to the tank (make note of where the hot water tanks thermostat is currently set so you can dial it back to the same setting later), then shut off the cold water valve feeding the cold side the tank.
Open the T&P (temperate and pressure) relief valve to allow the water pressure to drop and release a small amount of water into the floor drain. If your T&P relief valve isn’t adequately piped to your floor drain you might want to catch this water in a pan or bucket.
Attach a garden hose to the drain valve at the bottom of your tank and find a good place to drain the water (either in the floor drain by the hot water tank, or outside where you don’t mind a little muddy sediment discharge).
Open the drain valve and allow your hot water tank to drain. This should take about 20 to 30 minutes.
After the tank has been drained turn the tanks drain valve off, and the cold water valve back on. Your T&P relief value should still be open and is now being used to allow the air to escape as the tank fills. Don’t go anywhere! Your tank will fill in less than five minutes and when it does you need to be ready to turn off the T&P relief valve so water doesn't splash out everywhere. That’s it – your tank has been drained of sediment. Now you can turn the electricity back on, or for natural gas, turn the gas valve back on, light the pilot, and turn the hot water heaters thermostat back to where it was set before.
How to check your T&P relief valve:
To be sure the valve will allow water to run through it, just open and close the valve a few times. It should, of course, let water through while its open, and successfully stop the water when its closed. If no water comes out when it is open or water continues to leak past the T&P valve while it is closed, then it is no longer functioning properly and should be replaced.
Toilet & Sewer System Maintenance
To keep your toilet running freely, every 4-6 weeks pour Muriatic Acid into your stand pipe within your toilet tank.
To remove hard water stains try scrubbing with a Pumie™ Scouring Stick!
The Pumie Scouring Stick can be used for a variety of applications and is suitable for cleaning almost any hard surface. Use this product to clear rust and grime from workshop equipment and garden tools. It can help remove baked-on food, grease and carbon buildup from ovens, grills and iron cookware.
Both Muriadic Acid and Pumie Scouring Sticks are available at Mike's Home Centre!
To remove hard water stains try scrubbing with a Pumie™ Scouring Stick!
The Pumie Scouring Stick can be used for a variety of applications and is suitable for cleaning almost any hard surface. Use this product to clear rust and grime from workshop equipment and garden tools. It can help remove baked-on food, grease and carbon buildup from ovens, grills and iron cookware.
- Can be used to clean almost any hard surface
- Great for removing unsightly toilet bowl rings
- Ideal for cleaning stubborn stains in sinks, tubs and showers
- Suitable for removing rock-hard mineral deposits around faucets and drains
- Can be used on lime- and algae deposits in swimming pools
- Helps clear rust and grime from workshop equipment, garden tools, metalwork and piping
- Ideal for removing unwanted paint from tile, masonry and concrete surfaces
Both Muriadic Acid and Pumie Scouring Sticks are available at Mike's Home Centre!
Mildew on Walls

|
If you are experiencing black, grey or brown spots on the surface of paint or caulk some possible causes and solutions are listed below: |
POSSIBLE CAUSES:
- Forms most often on areas that tend to be damp, or receive little or no direct sunlight (e.g. bathrooms, kitchens and laundry rooms)
- Use of an alkyd or oil-based paint, or lower quality latex paint.
- Failure to prime bare wood surface before applying paint.
- Painting over a substrate or coating on which mildew has not been removed.
- Test for mildew by applying a few drops of household bleach to the area; if it is bleached away, the discoloration is probably mildew.
- Remove all mildew from the surface by scrubbing with a diluted household bleach solution (one part bleach to three parts water), while wearing rubber gloves and eye protection. Rinse thoroughly.
- To protect against mildew, use a top quality latex paint and clean when necessary with bleach/detergent solution.
- Consider installing an exhaust fan in high moisture areas of your home.
Problems with Outside Doors, Locks and Windows freezing:
If you are experiencing a problem with your outside doors, locks and windows freezing up in the winter time than you should check your humidity levels within your home. Below is a table to show the recommended humidity based on outside temperature.
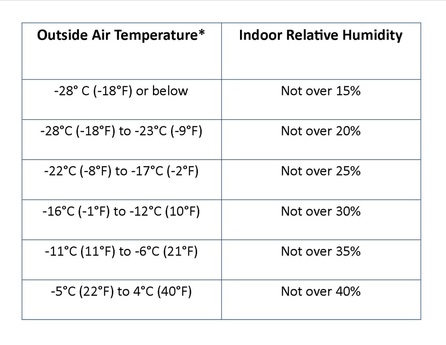
* Includes Wind Chill
Guidelines to follow when planning an Average Drywall Project
- you will need 1 lb. of drywall screws for every 6 sheets of drywall
- 7 kgs. of drywall compound for every 3 sheets of drywall
- 75' of tape for every 5 sheets of drywall
- 7 kgs. of drywall compound for every 3 sheets of drywall
- 75' of tape for every 5 sheets of drywall